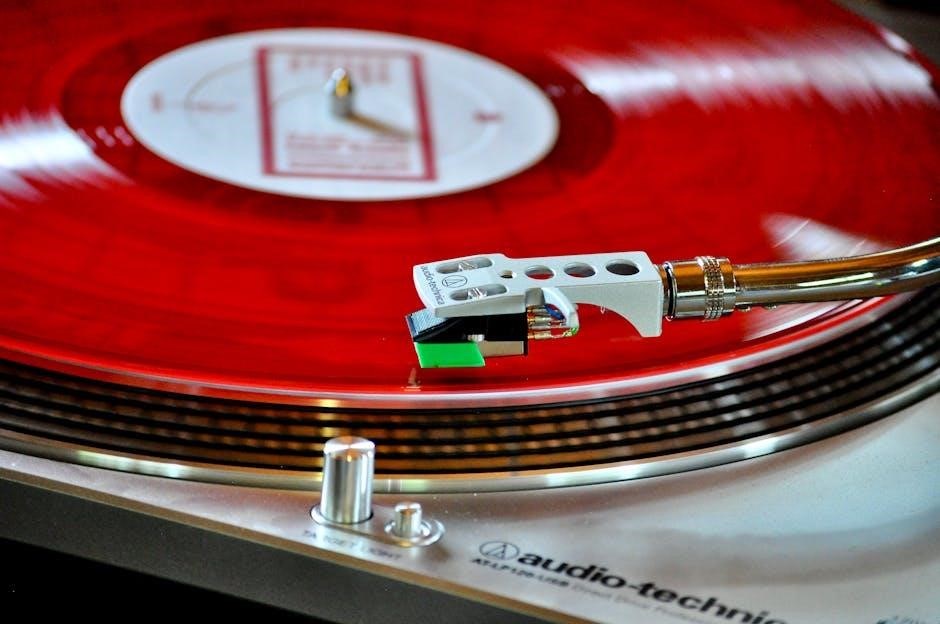
The AT-LP120XUSB is a versatile turntable, easily digitizing vinyl records while delivering warm, intimate sound. It’s a user-friendly option for both beginners and enthusiasts.
Overview of the Turntable
The Audio-Technica AT-LP120XUSB is a direct-drive turntable designed for both home listening and vinyl digitization. It’s celebrated for its ease of use and robust feature set, making it a popular choice for newcomers and seasoned record collectors alike. This turntable boasts adjustable dynamic anti-skate control and a selectable phono preamp, offering flexibility with various audio setups.
Its USB connectivity simplifies the process of converting vinyl to digital formats. The AT-LP120XUSB isn’t just about functionality; it’s about experiencing the rich, analog sound of vinyl records with modern convenience.
Key Features and Specifications
The AT-LP120XUSB features a direct-drive motor, ensuring consistent speed and reliable performance. It supports 33 ⅓, 45, and 78 RPM speeds, accommodating a wide range of vinyl records. Key specs include adjustable tracking force and anti-skate control for optimal sound quality. The built-in USB output facilitates easy digital recording, while the switchable phono preamp adds versatility.
Further specifications include a standard ¼ inch mount for headphone connection and robust construction for long-lasting durability, making it a standout choice.
Setting Up Your AT-LP120XUSB
Proper setup is crucial for optimal performance. Begin by carefully unpacking all components and connecting the turntable to a power source and speakers.
Unboxing and Component Check
Carefully unpack the AT-LP120XUSB, verifying all included components are present. You should find the turntable base, platter, dust cover, counterweight, headshell with cartridge, USB cable, RCA output cable, and the instruction manual. Inspect each item for any shipping damage. Ensure the platter spins freely and the tonearm moves smoothly. The headshell should be securely attached, and the cartridge properly aligned. Retain the packaging for potential future transport or warranty claims. A thorough component check ensures a hassle-free setup process and optimal performance from the start.
Connecting the Turntable
Establishing proper connections is crucial for optimal audio quality. First, connect the RCA output cables to your amplifier or receiver, ensuring a secure fit. If using external speakers, connect those as well. Next, connect the USB cable to your computer for digitizing vinyl. Remember to ground the turntable by attaching the grounding wire to the grounding terminal on your amplifier to eliminate hum. Double-check all connections before powering on to prevent potential damage and ensure a clean signal path.
Power Connection
The AT-LP120XUSB utilizes a standard power adapter for operation. Carefully insert the adapter’s plug into the DC power input on the rear panel of the turntable. Then, plug the adapter into a functioning electrical outlet. Ensure the voltage of the outlet matches the adapter’s specifications to avoid damage. A stable power supply is essential for consistent speed and reliable performance. Always disconnect the power adapter when not in use or during extended periods of inactivity.
Grounding the Turntable
Proper grounding minimizes hum and noise during playback. Connect the ground wire, found on the turntable’s rear panel, to the grounding terminal on your amplifier or receiver. If your receiver lacks a ground terminal, connect it to a metal screw on the chassis. A secure ground connection is crucial for optimal audio quality. Ensure the connection is tight to prevent intermittent noise; Regularly check the ground wire for corrosion or looseness.
Speaker Connection (Built-in vs. External)
The AT-LP120XUSB offers flexibility in speaker connections. It features built-in phono preamps, allowing direct connection to standard RCA inputs on powered speakers; For enhanced audio quality, utilize external preamps and amplifiers. Connect the RCA outputs to your receiver or powered speakers. Ensure correct polarity (red to red, white to white). Experiment with different speaker setups to find what best suits your listening preferences and room acoustics.
Digitizing Vinyl with the AT-LP120XUSB
The AT-LP120XUSB easily converts vinyl to digital formats via USB. Software installation is key, enabling recording and preservation of your favorite albums.
Software Installation
To digitize your vinyl, installing the appropriate software is crucial. Audio-Technica provides download links for Audacity, a popular free audio editor, and WavePad, another viable option, directly on their support website. Alternatively, users can employ their preferred audio recording and editing software, ensuring compatibility with USB audio input.
The installation process is generally straightforward, involving downloading the installer, following on-screen prompts, and potentially restarting your computer. Refer to the software’s specific documentation for detailed instructions. Proper software setup ensures seamless recording and optimal audio quality from your AT-LP120XUSB.
Recording Process
Initiating the recording process involves connecting the AT-LP120XUSB to your computer via USB. Launch your chosen audio software (Audacity, WavePad, etc.) and select the turntable as the audio input device. Begin playback on the turntable, and the software will capture the audio signal.
Monitoring the recording levels is vital for optimal sound quality. Adjust the input volume within the software to prevent clipping or excessively low signals. Once satisfied, start the recording and enjoy converting your vinyl collection into digital files!
Setting Input Levels
Proper input level adjustment is crucial for clean recordings. Within your recording software, monitor the input meter while the record plays. Aim for peaks reaching around -6dB to -3dB to avoid distortion (clipping). Avoid letting the meter hit 0dB.
If the signal is too low, increase the volume on your audio interface or within the recording software. Conversely, reduce the volume if clipping occurs. Experiment to find the sweet spot for optimal audio fidelity.
Audio File Formats (USB Connection)
When digitizing via USB, the AT-LP120XUSB allows for several recording formats. Commonly, users choose between MP3 and WAV. MP3 offers smaller file sizes, ideal for portability, but with some compression and potential loss of audio quality.
WAV files are uncompressed, preserving the full dynamic range and detail of your vinyl. For archiving or critical listening, WAV is the preferred choice. Your recording software will dictate available bitrates and sample rates for each format.
Troubleshooting Recording Issues
If experiencing recording problems, first check USB connectivity and software settings. Ensure the AT-LP120XUSB is recognized by your computer. Low input levels can cause quiet recordings; adjust the recording volume within your software. Distorted audio often indicates levels are too high, requiring reduction.
Humming or buzzing may stem from grounding issues; verify proper grounding. If the recording cuts out, check the USB cable for damage or try a different port. Software conflicts can also occur; update or reinstall your recording program.
Understanding the Turntable Controls
The AT-LP120XUSB features intuitive controls for power, speed, cueing, and pitch adjustment. Mastering these allows for optimal playback and precise vinyl handling.
Power and Speed Selection
The AT-LP120XUSB’s power switch is conveniently located for easy access, initiating the turntable’s operation. Speed selection is crucial for accurate playback; the unit supports 33 ⅓, 45, and 78 RPM speeds. A selector switch allows you to choose the correct speed based on your record type. Ensure the belt is properly positioned for stable rotation. Incorrect speed settings will result in distorted or off-pitch audio. Always double-check the speed before dropping the needle to preserve your vinyl’s sound quality and prevent damage.
Tonearm Controls
The AT-LP120XUSB’s tonearm features controls for precise playback. The cueing lever gently raises and lowers the stylus, preventing damage to both the record and the needle. Proper use extends the life of your vinyl. The anti-skate adjustment compensates for the inward force on the tonearm, ensuring balanced groove tracking and minimizing distortion. Adjusting this setting is vital for optimal sound reproduction and preventing uneven wear on your records. Careful manipulation of these controls enhances the listening experience.
Cueing Lever
The cueing lever on the AT-LP120XUSB gently raises and lowers the stylus onto the record’s surface. This prevents accidental needle drops, which can cause damage to both the vinyl and the delicate stylus tip. Slowly raising and lowering the tonearm with the lever ensures a smooth and controlled start and end to each playback. It’s crucial for preserving the quality of your records and extending the lifespan of your needle.
Anti-Skate Adjustment
The anti-skate control on the AT-LP120XUSB compensates for the inward force exerted on the tonearm during playback. Without proper adjustment, the stylus can wear unevenly, and tracking may be compromised. Setting the anti-skate to match the tracking force ensures balanced pressure on both grooves, minimizing distortion and maximizing sound quality. Experiment with small adjustments to find the optimal setting for your cartridge and records.
Pitch Control
The AT-LP120XUSB’s pitch control allows for subtle speed adjustments of the platter, enabling you to fine-tune the playback speed of your vinyl records. This feature is particularly useful for beatmatching during DJing or correcting minor speed inconsistencies in older recordings. The slider offers both positive and negative adjustments, indicated by percentage markings. Use it cautiously, as significant changes can affect audio quality.
Maintenance and Care
Regular cleaning and stylus replacement are crucial for optimal performance and longevity of your AT-LP120XUSB. Proper care preserves sound quality and prevents record damage.
Cleaning the Turntable
Maintaining a clean turntable is essential for optimal performance and preserving your vinyl collection. Regularly dust the plinth and tonearm with a soft, dry cloth to remove debris. For the platter, gently wipe with a slightly damp cloth – avoid getting liquid near the spindle.
The stylus requires careful cleaning. Use a stylus brush, brushing from back to front, to remove dust. Avoid excessive pressure. Periodically, a stylus cleaning solution can be used, following the manufacturer’s instructions. A clean stylus ensures accurate tracking and prevents damage to your records, extending their lifespan and improving audio fidelity.
Replacing the Stylus
The stylus is a crucial component, and periodic replacement is necessary to maintain sound quality and prevent record damage. Gently remove the old stylus using tweezers or a stylus removal tool – avoid pulling directly. Align the new stylus carefully with the cartridge pins, ensuring a secure connection.
Consult the AT-LP120XUSB manual for specific instructions and diagrams; Proper alignment is vital for accurate tracking and minimizing wear on your vinyl. Replacing the stylus restores optimal audio performance and protects your valuable record collection from potential damage.
Belt Replacement
Over time, the drive belt can stretch or wear, impacting platter speed and audio quality. To replace it, carefully remove the platter and locate the old belt around the motor pulley. Gently remove the worn belt and loop the new belt around the pulley and platter spindle.
Refer to the AT-LP120XUSB manual for detailed diagrams. Ensure the belt is properly seated before reassembling the turntable. A new belt restores accurate speed and smooth operation, enhancing your listening experience and preserving your vinyl.
Troubleshooting Common Issues
Addressing problems like no sound, skipping, or motor noise is often straightforward. Consult the AT-LP120XUSB manual for solutions and ensure proper connections.
No Sound Output
If you experience no sound, first verify all connections: power, grounding, and speaker outputs. Ensure the turntable is selected as the input source on your amplifier or audio interface. Check the volume levels on both the turntable and your connected device. Confirm the cartridge is properly installed and the stylus isn’t damaged.
Also, examine the preamp situation. Is the built-in preamp enabled, or are you using an external one? Incorrect preamp settings can cause silence. Finally, consult the AT-LP120XUSB manual for detailed troubleshooting steps specific to your setup.
Skipping or Repeating Records
Record skipping or repeating often indicates insufficient tracking force or an improperly adjusted anti-skate setting. Consult the AT-LP120XUSB manual to correctly set these parameters based on your cartridge’s specifications. Ensure the tonearm moves freely and isn’t obstructed. A dirty stylus can also cause issues; clean it gently with a stylus brush.
Warped records are a common culprit. Try playing a different record to isolate the problem. If skipping persists, the cartridge or stylus may require replacement. Verify the turntable is on a stable, level surface to minimize vibrations.
Motor Noise
Unusual motor noise can stem from several sources. First, ensure the turntable is placed on a stable, level surface to minimize vibrations. Check the belt for wear or looseness, referencing the AT-LP120XUSB manual for proper replacement procedures. A worn or damaged motor bearing could also be the cause, potentially requiring professional repair.
Sometimes, external interference contributes to the noise. Try relocating the turntable away from other electronic devices. If the noise persists, consult a qualified technician for diagnosis and repair.
Advanced Features and Customization
Unlock the AT-LP120XUSB’s full potential with external preamps, adjustable tracking force, and cartridge upgrades for a tailored listening experience.
Using with External Preamps
The AT-LP120XUSB offers a selectable phono/line switch, enabling seamless integration with external preamps for enhanced audio fidelity. Utilizing an external preamp bypasses the turntable’s built-in option, potentially revealing greater detail and warmth from your vinyl collection. This is particularly beneficial when paired with higher-quality audio systems and speakers. Connecting is straightforward: disable the phono setting on the turntable and connect the RCA outputs to your preamp’s inputs, then connect the preamp’s output to your amplifier. Experimenting with different preamps allows for personalized sound customization.
Adjusting Tracking Force
Proper tracking force is crucial for optimal vinyl playback and stylus longevity on the AT-LP120XUSB. The turntable features a counterweight at the rear of the tonearm used to adjust this force, measured in grams. Begin by zeroing the counterweight, then incrementally increase it according to your cartridge manufacturer’s specifications – typically between 1.5 and 2.5 grams. Use a stylus force gauge for precise measurement, ensuring the stylus sits correctly in the groove without excessive pressure or lightness.
Cartridge Upgrade Options
The AT-LP120XUSB’s standard cartridge is good, but upgrading unlocks superior audio fidelity. Popular choices include the Audio-Technica AT-VM95ML (microlinear stylus) for detailed sound, or the Nagaoka MP-110 for a warmer, more forgiving presentation. Ensure compatibility with the turntable’s headshell and tracking force range. Upgrading requires careful alignment and adjustment, potentially needing specialized tools and knowledge for optimal performance. Consider professional installation if you’re unfamiliar with cartridge mounting.
Audio Library Integration
YouTube Studio’s Audio Library offers royalty-free music and sound effects for enhancing videos created with digitized vinyl from the AT-LP120XUSB.
Utilizing Royalty-Free Music
Digitizing your vinyl collection with the Audio-Technica AT-LP120XUSB opens exciting possibilities for creative projects, particularly video content creation. The YouTube Audio Library provides a vast selection of production music and sound effects, all available for free use without copyright concerns. This is incredibly valuable for adding atmosphere, transitions, or background scores to videos featuring music ripped from your records.
Accessing these resources within YouTube Studio is straightforward, allowing you to seamlessly integrate royalty-free tracks with your digitized audio, enhancing the overall production quality and avoiding potential legal issues.
Sound Effects Enhancement
Beyond music, the YouTube Audio Library offers a diverse range of sound effects perfect for enriching your projects alongside digitized vinyl recordings. These effects – from subtle ambiance to dramatic impacts – can significantly elevate video production value. Utilizing these royalty-free sounds avoids copyright complications, ensuring your creations remain legally sound.
Integrating sound effects with music digitized via the AT-LP120XUSB allows for dynamic storytelling and immersive audio experiences, transforming simple recordings into polished, professional content. Explore the library’s categories to find the perfect sonic elements.
Headphone Usage
The AT-LP120XUSB supports direct headphone connection for private listening. Compatibility varies; ensure your headphones function optimally with the turntable’s output impedance.
Direct Headphone Connection
The AT-LP120XUSB features a standard 3.5mm headphone jack located on the front panel, enabling convenient, private listening without needing external amplification. This allows for immediate monitoring of your vinyl playback or recording sessions. When headphones are connected, the turntable’s speaker output is typically muted, ensuring focused audio delivery.
However, the quality of the headphone experience can depend on the impedance of your headphones; lower impedance headphones generally perform better. Always adjust the volume to a safe level to prevent hearing damage.
Headphone Compatibility
The AT-LP120XUSB’s headphone jack generally works well with most standard headphones, but impedance plays a role in audio quality. Lower impedance headphones (typically under 80 ohms) will likely deliver a louder and clearer sound. Higher impedance headphones might require an external headphone amplifier for optimal performance.
While the turntable supports various headphone types, professional studio headphones may reveal limitations in the built-in headphone amplifier. Experiment to find what sounds best to you!
Repair Services
Finding qualified technicians is crucial for AT-LP120XUSB repairs. User reviews and feedback can help locate reliable services for audio equipment maintenance.
Finding Qualified Technicians
Locating a skilled technician for your AT-LP120XUSB is paramount for ensuring optimal performance and longevity. Begin by searching online for audio equipment repair services in your area, specifically mentioning Audio-Technica turntables.
Prioritize technicians with demonstrable experience in vinyl record player repair.
Explore online forums and communities dedicated to vinyl enthusiasts; these platforms often host recommendations and reviews of reputable repair professionals.
Don’t hesitate to inquire about their experience with the AT-LP120XUSB model specifically, and request quotes from multiple technicians before committing to a repair.
User Reviews and Feedback
Analyzing user reviews provides invaluable insight into the real-world performance of the AT-LP120XUSB. Online platforms and audio forums are brimming with experiences from fellow vinyl enthusiasts.
Common praise centers around its ease of setup, robust build quality, and effective digitization capabilities.
However, some users note the importance of carefully following the manual for optimal setup, particularly regarding grounding and anti-skate adjustments.
Positive feedback consistently highlights its value for both beginners and experienced listeners alike.
Latest News and Updates (as of 02/14/2026)
Recent audio trends include the EXO series, Eve Audio monitor updates, and Google’s Audio Emoji feature. Repair services are also gaining traction.
EXO Series Trend
The burgeoning Berlin-based EXO series is rapidly gaining popularity within the audio community as of late 2025. This new line represents a fresh aesthetic and approach to audio equipment design, capturing attention for its innovative features and sleek presentation. While details remain somewhat limited, early reports suggest a focus on high-fidelity sound reproduction and user-centric functionality. The EXO series is quickly becoming a talking point, influencing discussions about future audio technology and design trends, and sparking considerable interest among audiophiles and professionals alike.
Eve Audio Monitor Updates
Eve Audio has recently released updates to their studio monitor line, refining already impressive characteristics without a complete overhaul. These enhancements focus on subtle improvements to sonic clarity and imaging, building upon the brand’s reputation for accurate and detailed sound reproduction. The updates aren’t revolutionary, but represent a commitment to continuous improvement and addressing user feedback. These refined monitors aim to provide audio professionals and enthusiasts with an even more precise and immersive listening experience, solidifying Eve Audio’s position in the market.
Google Phone App Audio Emoji
A recent update to the Google Phone app introduced audio emojis, a feature initially thought to be lost by some users. This addition provides a visual representation of sounds during calls – indicating whether the speaker, keypad, or mute function is active. The audio emoji enhance usability, offering quick visual cues for call control. This seemingly small update improves the overall calling experience, making it more intuitive and user-friendly for Google Phone app users worldwide.
Audio Equipment Repair Trends
Currently, there’s a growing demand for qualified audio equipment technicians, fueled by a resurgence in vinyl and pro-audio interest. Finding skilled repair professionals is becoming increasingly important for maintaining valuable gear. User reviews and feedback are crucial in identifying reliable technicians. Online platforms facilitate connecting owners with qualified repair services, ensuring optimal performance and longevity of audio investments. This trend highlights the value of skilled maintenance in the audio world.